The menu bar is a horizontal bar that consists of labels of menus in an operating system GUI and other applications. For creating the menu in Angular material, the md-menubar container component is used that hold multiple menus.
Menu items in Angular
Steps to implement menu items in Angular applications are as follows:
Step 1:
Import Angular Material Menu moduleWe can import material menu module (MatMenuModule) in the app.components.ts file or app.module.ts file that can be used across the application.
import {MatMenuModule} from '@angular/material/menu'; Step 2: Use mat Menu selector to display Menu Items
After importing the MatMenuModule in the component file, use mat-menu selector that is a floating panel containing list of menu options.
<mat-menu #menu="matMenu">

  <button mat-menu-item>Menu Item 1</button>

  <button mat-menu-item>Menu Item 2</button>

</mat-menu>
Add a template reference variable to the mat-menu that refers to the menu panel.
<mat-menu #menu="matMenu"></mat-menu> Step 3: Add matMenuTriggerFor Element
The mat-menu element in the UI does not render anything.
The menu must be associated with a trigger element that open and close the menu using the matMenuTriggerFor directive.
<button mat-button [matMenuTriggerFor]="menu">Simple Menu</button>

<mat-menu #menu="matMenu">

  <button mat-menu-item>Menu Item 1</button>

  <button mat-menu-item>Menu Item 2</button>

</mat-menu>
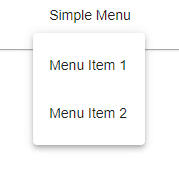
In the above example, we attach the mat-menu container to a “Simple Menu” button by the matMenuTriggerFor attribute.

Changing mat Menu Position
By default, the material menu will be displayed under the menu trigger element.
To change the menu position, we use the xPosition and yPosition properties of the mat-menu selector.
mat-Menu position Before or after
If you want to display menus before and after the menu trigger element, we can pass the xPosition value as “before” or “after.”
The xPosition property changes the menu position on the horizontal axis.
<button mat-button [matMenuTriggerFor]="beforeMenu">Before</button>

<mat-menu #beforeMenu="matMenu" xPosition="before">

  <button mat-menu-item>Item 1</button>

  <button mat-menu-item>Item 2</button>

</mat-menu>

<button mat-button [matMenuTriggerFor]="afterMenu">After</button>

<mat-menu #afterMenu="matMenu" xPosition="after">

  <button mat-menu-item>Item 1</button>

  <button mat-menu-item>Item 2</button>

</mat-menu>
Mat Menu position above or below
To display the menu position above the menu trigger element set yPosition property as above. It is used to change the menu position across the vertical axis. It accepts the values above or below.
<button mat-button [matMenuTriggerFor]="aboveMenu">Above</button>

<mat-menu #aboveMenu="matMenu" yPosition="above">

  <button mat-menu-item>Item 1</button>

  <button mat-menu-item>Item 2</button>

</mat-menu>

<button mat-button [matMenuTriggerFor]="belowMenu">Below</button>

<mat-menu #belowMenu="matMenu" yPosition="below">

  <button mat-menu-item>Item 1</button>

  <button mat-menu-item>Item 2</button>

</mat-menu>
Mat Menu with Icons
We display material icons before the menu item text by placing mat-icon elements.
<button mat-button [matMenuTriggerFor]="menu">MenuIcon</button>

<mat-menu #menu="matMenu?>

  <button mat-menu-item><mat-icon>home</mat-icon><span>Home</span></button>

</mat-menu>
Example:
The below example shows the use of md-menu-bar directive and also the uses of menu-bar.
app.component.html
<html lang = "en">

   <head>

      <link rel = "stylesheet"

         href = "https://ajax.googleapis.com/ajax/libs/angular_material/1.0.0/angular-material.min.css">

      <script src = "https://ajax.googleapis.com/ajax/libs/angularjs/1.4.8/angular.min.js"></script>

      <script src = "https://ajax.googleapis.com/ajax/libs/angularjs/1.4.8/angular-animate.min.js"></script>

      <script src = "https://ajax.googleapis.com/ajax/libs/angularjs/1.4.8/angular-aria.min.js"></script>

      <script src = "https://ajax.googleapis.com/ajax/libs/angularjs/1.4.8/angular-messages.min.js"></script>

      <script src = "https://ajax.googleapis.com/ajax/libs/angular_material/1.0.0/angular-material.min.js"></script>

      <link rel = "stylesheet" href = "https://fonts.googleapis.com/icon?family=Material+Icons">

      <script language = "javascript">

         angular

            .module('firstApplication', ['ngMaterial'])

            .controller('menubarController', menubarController);

         function menubarController ($scope, $mdDialog) {

            this.sampleAction = function(name, ev) {

               $mdDialog.show($mdDialog.alert()

                  .title(name)

                  .textContent('Start learning "' + name + '!')

                  .ok('OK')

                  .targetEvent(ev)

               );

            };

         }

      </script>

   </head>

   <body ng-app = "firstApplication">

      <div id = "menubarContainer" ng-controller = "menubarController as ctrl"

         layout = "row" ng-cloak>

         <md-toolbar class = "md-menu-toolbar">

            <div layout = "row">

               <div>

                  <h2 class = "md-toolbar-tools">Learn @JavaTpoint</h2>

                  <md-menu-bar>

                     <md-menu>

                        <button ng-click = "$mdOpenMenu()">Tutorials</button>

                        <md-menu-content>

                           <md-menu-item>

                              <md-button ng-click = "ctrl.sampleAction('share', $event)">Share...</md-button>

                           </md-menu-item>

                           <md-menu-divider></md-menu-divider>

                           <md-menu-item>

                              <md-menu>

                                 <md-button

                                    ng-click = "$mdOpenMenu()">Learn</md-button>

                                 <md-menu-content>

                                    <md-menu-item>

                                       <md-button

                                       ng-click = "ctrl.sampleAction('HTML5', $event)">

                                       HTML5</md-button>

                                    </md-menu-item>

                                    <md-menu-item>

                                       <md-button

                                          ng-click = "ctrl.sampleAction('jQuery', $event)">

                                          jQuery</md-button>

                                    </md-menu-item>

                                    <md-menu-item>

                                       <md-button

                                          ng-click = "ctrl.sampleAction('AngularJS', $event)">

                                          AngularJS</md-button>

                                    </md-menu-item>

                                    <md-menu-item>

                                       <md-button disabled = "disabled"

                                          ng-click = "ctrl.sampleAction('AngularJS 2.0', $event)">

                                          AngularJS 2.0</md-button>

                                    </md-menu-item>

                                    <md-menu-divider></md-menu-divider>

                                    <md-menu-item>

                                       <md-button

                                          ng-click = "ctrl.sampleAction('CSS', $event)">

                                          CSS</md-button>

                                    </md-menu-item>

                                 </md-menu-content>

                              </md-menu>

                           </md-menu-item>

                        </md-menu-content>

                     </md-menu>

                  </md-menu-bar>

               </div>

            </div>

         </md-toolbar>

      </div>

   </body>

</html>
Output:

Leave a Reply