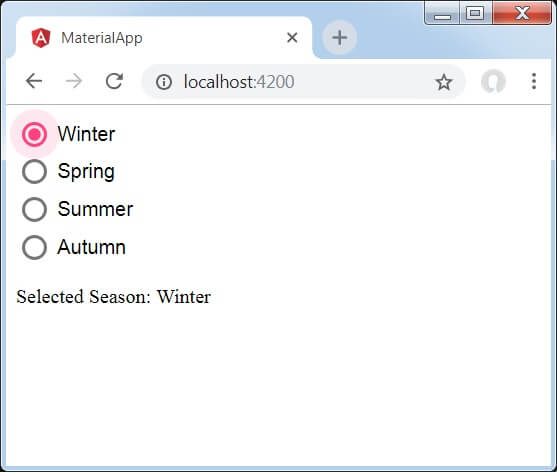
The <mat-radiobutton> is used for <input type=”radio”> for enhance the material design-based styling. It provides the same functionality as the <input type=”radio”> with Angular Material Design styling and animations.
Radio-Button Label
The radio-button label is provided as the content of the <mat-radiobutton> element. If you do not want the label to appear next to the radio button, you use the area-label to specify the appropriate label.
Radio Groups
The radio-button should be placed inside the <mat-radio-group> unless the DOM structure makes that impossible (e.g., the radio button inside the table cell) impossible. Different radio buttons inside a radio group will inherit the group name.
Use with @angular/forms
<mat-radio-group> is compatible with @angular/forms and support the ReactiveFormsModule.
Accessibility
<Mat-radio-button> uses internal <input type = “radio”> to provide an accessible experience. This internal radio button receives focus and is automatically labelled the text content of <mat-radio-button> element.
Radio button groups must be given a meaningful label through an area-label or area-labelledby.
Default Color Configuration
The default color for radio buttons is configured globally by using the MAT_RADIO_DEFAULT_OPTIONS provider.
providers: [{

    provide: MAT_RADIO_DEFAULT_OPTIONS,

    useValue: { color: 'accent' },

}]
Example: 1
app.component.html
<mat-radio-group aria-label="Select an option">

  <mat-radio-button value="1">Option 1</mat-radio-button>

  <mat-radio-button value="2">Option 2</mat-radio-button>

</mat-radio-group>
app.component.ts
import {Component} from '@angular/core';

/**

 * @title Basic radios

 */

@Component({

  selector: 'radio-overview-example',

  templateUrl: 'radio-overview-example.html',

  styleUrls: ['radio-overview-example.css'],

})

export class RadioOverviewExample {}
app.component.css
.mat-radio-button ~ .mat-radio-button {

  margin-left: 16px;

}
Output:

If Radio buttons with the same name occurs then only one may be selected at a time.
Example 2:
import { AppComponent } from 'app.component';

import {FormsModule, ReactiveFormsModule} from '@angular/forms';

import {BrowserAnimationsModule} from '@angular/platform-browser/animations';

import {MatRadioModule} from '@angular/material'

import { BrowserModule } from '@angular/platform-browser';

import { NgModule } from '@angular/core';

@NgModule({

   declarations: [

      AppComponent

   ],

   imports: [

      BrowserModule,

      BrowserAnimationsModule,

      MatRadioModule,

      FormsModule,

      ReactiveFormsModule

   ],

   providers: [],

   bootstrap: [AppComponent]

})

export class AppModule { }
Below is the modified CSS file app.component.css.
.tp-radio-group {

   display: inline-flex;

   flex-direction: column;

}

.tp-radio-button {

   margin: 5px;

}

.tp-selected-value {

   margin: 15px 0;

}
app.component.ts
import { Validators } from "@angular/forms";

import { FormControl } from "@angular/forms";

import { Component } from '@angular/core';

@Component({

   selector: 'app-root',

   templateUrl: './app.component.html',

   styleUrls: ['./app.component.css']

})

export class AppComponent {

   title = 'materialApp';

   favoriteSeason: string;

   seasons: string[] = ['Winter', 'Spring', 'Summer', 'Autumn'];

}
app.component.ts
import { Validators } from "@angular/forms";

import { FormControl } from "@angular/forms";

import { Component } from '@angular/core';

@Component({

   selector: 'app-root',

   templateUrl: './app.component.html',

   styleUrls: ['./app.component.css']

})

export class AppComponent {

   title = 'materialApp';

   favoriteSeason: string;

   seasons: string[] = ['Winter', 'Spring', 'Summer', 'Autumn'];

}
Below is the HTML host file app.component.html.
<mat-radio-group class = "tp-radio-group" [(ngModel)] = "favoriteSeason">

   <mat-radio-button class = "tp-radio-button"

      *ngFor = "let season of seasons" [value] = "season">

      {{season}}

   </mat-radio-button>

</mat-radio-group>

<div class = "tp-selected-value">

   Selected Season: {{favoriteSeason}}

</div>
Output:

Explanation:
First, we have created a radio button group using mat-radio-group bound with ngModel. Then, we have added radio buttons by using the mat-radio-button.
Leave a Reply