<mat-menu> is a temporary panel containing a list of options. It is used to create menus and engage with controls along with content design, styling, and animation capabilities.
The <mat-menu> element itself does not represent anything. The menu is attached and opened by the application of matMenuTriggerFor directive:
<button mat-button [matMenuTriggerFor]="menu">Menu</button> The menu exposes an API to open/close programmatically. Note that in this case, a matMenuTriggerFor directive is required to attach a menu to trigger the element in the DOM.
class MyComponent {

  @ViewChild(MatMenuTrigger) trigger: MatMenuTrigger;

  someMethod() {

    this.trigger.openMenu();

  }

}
Icons
Menu displaying mat-icon elements before the menu item text.
<button mat-icon-button [matMenuTriggerFor]="menu" aria-label="Example icon-button with a menu">

  <mat-icon>more_vert</mat-icon>

</button>

<mat-menu #menu="matMenu">

  <button mat-menu-item>

    <mat-icon>dialpad</mat-icon>

    <span>Redial</span>

  </button>

  <button mat-menu-item disabled>

    <mat-icon>voicemail</mat-icon>

    <span>Check voice mail</span>

  </button>

  <button mat-menu-item>

    <mat-icon>notifications_off</mat-icon>

    <span>Disable alerts</span>

  </button>

</mat-menu>
Customizing Menu Position
By default, the menu will display (y-axis), after (x-axis), without overlapping its trigger. The position can be changed using the xPosition (before | after) and yPosition (up | down) attributes. Using the overlapTrigger attribute, the menu can be forced to overlap the trigger.
<mat-menu #aboveMenu="matMenu" yPosition="above"> Nested Menu
The content supports the ability of a matte-menu-item to open a sub-menu. To do this, we need to define our root menu and sub-menu, in addition to setting [matMenuTriggerFor] on the mat-menu-item that triggers the sub-menu:
<mat-menu #animals="matMenu">

  <button mat-menu-item [matMenuTriggerFor]="vertebrates">Vertebrates</button>

  <button mat-menu-item [matMenuTriggerFor]="invertebrates">Invertebrates</button>

</mat-menu>

<mat-menu #vertebrates="matMenu">

  <button mat-menu-item [matMenuTriggerFor]="fish">Fishes</button>

  <button mat-menu-item [matMenuTriggerFor]="amphibians">Amphibians</button>

  <button mat-menu-item [matMenuTriggerFor]="reptiles">Reptiles</button>

  <button mat-menu-item>Birds</button>

  <button mat-menu-item>Mammals</button>

</mat-menu>
Lazy Rendering
By default, menu content will be initialized when the panel is closed. To postpone initialization the content can be provided as an N-template until the matmenucontent is open.
<mat-menu #appMenu="matMenu">

  <ng-template matMenuContent>

    <button mat-menu-item>Settings</button>

    <button mat-menu-item>Help</button>

  </ng-template>

</mat-menu>

<button mat-icon-button [matMenuTriggerFor]="appMenu">

  <mat-icon>more_vert</mat-icon>

</button>
Passing in Data to a Menu
When using lazy rendering, additional reference data can be passed through the menu panel via matMenuTriggerData input. It allows a single menu instance to be provided with a different set of data, depending on the trigger that opens it:
<mat-menu #appMenu="matMenu">

  <ng-template matMenuContent let-name="name">

    <button mat-menu-item>Settings</button>

    <button mat-menu-item>Log off {{name}}</button>

  </ng-template>

</mat-menu>

<button mat-icon-button [matMenuTriggerFor]="appMenu" [matMenuTriggerData]="{name: 'Sally'}">

  <mat-icon>more_vert</mat-icon>

</button>

<button mat-icon-button [matMenuTriggerFor]="appMenu" [matMenuTriggerData]="{name: 'Bob'}">

  <mat-icon>more_vert</mat-icon>

</button>
Keyboard interaction
- DOWN_ARROW: It focuses the next menu item
- UP_ARROW: It focuses previous menu item
- RIGHT_ARROW: It opens the menu item’s sub-menu
- LEFT_ARROW: It closes the current menu, and it is a sub-menu
- ENTER: It activates the focused menu item
- ESCAPE: Escape closes the menu
Accessibility
Menu triggers and menu items without text or labels have given a meaningful label via aria-label and aria-labelledby.
Example 1:
app.component.html
<button mat-button [matMenuTriggerFor]="menu">Menu</button>

<mat-menu #menu="matMenu">

  <button mat-menu-item>Item 1</button>

  <button mat-menu-item>Item 2</button>

</mat-menu>
app.component.ts
import {Component} from '@angular/core';

/**

 * @title Basic menu

 */

@Component({

  selector: 'menu-overview-example',

  templateUrl: 'menu-overview-example.html',

})

export class MenuOverviewExample {}
Output:

Example 2:
Modified module descriptor app.module.ts.
import { BrowserModule } from '@angular/platform-browser';

import { NgModule } from '@angular/core';

import { AppComponent } from './app.component';

import {BrowserAnimationsModule} from '@angular/platform-browser/animations';

import {MatMenuModule, MatButtonModule} from '@angular/material'

import {FormsModule, ReactiveFormsModule} from '@angular/forms';

@NgModule({

   declarations: [

      AppComponent

   ],

   imports: [

      BrowserModule,

      BrowserAnimationsModule,

      MatMenuModule, MatButtonModule,

      FormsModule,

      ReactiveFormsModule

   ],

   providers: [],

   bootstrap: [AppComponent]

})

export class AppModule { }
Following is the content of the modified HTML host file app.component.html.
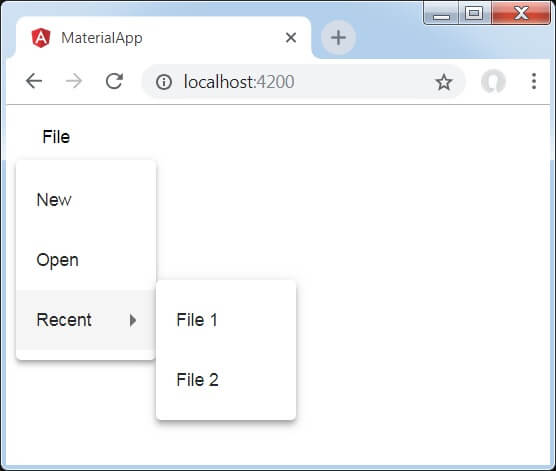
<button mat-button [matMenuTriggerFor] = "menu">File</button>

<mat-menu #menu = "matMenu">

   <button mat-menu-item>New</button>

   <button mat-menu-item>Open</button>

   <button mat-menu-item [matMenuTriggerFor] = "recent">Recent</button>

</mat-menu>

<mat-menu #recent = "matMenu">

   <button mat-menu-item>File 1</button>

   <button mat-menu-item>File 2</button>

</mat-menu>
Output:

Explanation:
We have created two menu using mat-menu and then bind them to buttons by using matMenuTriggerFor. MatMenuTriggerFor passed the menu identifier to attach the menu.
Leave a Reply