The datepicker allows the users to enter a date by text input or choose a date from calendar. It consists of a text input and a calendar popup that is associated with the matDatepicker property on the text input.
There is an optional datepicker toggle button that gives the user an easy way to open the datepicker pop-up.
 <input matInput [matDatepicker] ="picker">

<mat-datepicker-toggle matSuffix [for]="picker"></mat-datepicker-toggle>

<mat-datepicker #picker></mat-datepicker>
It is an input that is the part of <mat-form-field> and the toggle can be used as a prefix or suffix on the content input.
<mat-form-field appearance="fill">

  <mat-label>Choose a date</mat-label>

  <input matInput [matDatepicker]="picker">

  <mat-datepicker-toggle matSuffix [for]="picker"></mat-datepicker-toggle>

  <mat-datepicker #picker></mat-datepicker>

</mat-form-field>
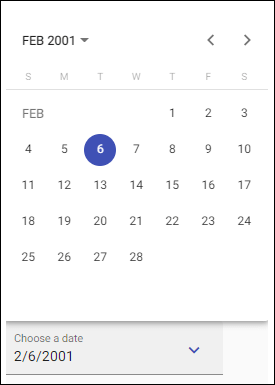
If we want to customize the icon inside the mat-datepicker-toggle, we can do so by using the matDatepickerToggleIcon directive.
app.component.html
<mat-form-field class="example-full-width" appearance="fill">

  <mat-label>Choose a date</mat-label>

  <input matInput [matDatepicker]="picker">

  <mat-datepicker-toggle matSuffix [for]="picker">

    <mat-icon matDatepickerToggleIcon>keyboard_arrow_down</mat-icon>

  </mat-datepicker-toggle>

  <mat-datepicker #picker></mat-datepicker>

</mat-form-field>
app.component.ts
import {Component} from '@angular/core';

/** @title Datepicker with custom icon */

@Component({

  selector: 'datepicker-custom-icon-example',

  templateUrl: 'datepicker-custom-icon-example.html',

})

export class DatepickerCustomIconExample {}
Output:
Date Range Selection
If we want to select multiple types of dates, we can use the mat-date-range-input and mat-date-range-picker components. They operate in tandem, similarly to mat-datepicker and required date picker input.
<mat-date-range-input>

  <input matStartDate placeholder="Start date">

  <input matEndDate placeholder="End date">

</mat-date-range-input>
The mat-date-range-picker serves as a pop-up panel for selecting component dates. It works in the same way as matte-datepicker, but allows the user to select multiple times:
<mat-date-range-picker #picker></mat-date-range-picker> Connect the range picker using the rangePicker property:
<mat-date-range-input [rangePicker]="picker">

  <input matStartDate placeholder="Start date">

  <input matEndDate placeholder="End date">

</mat-date-range-input>

<mat-date-range-picker #picker></mat-date-range-picker> 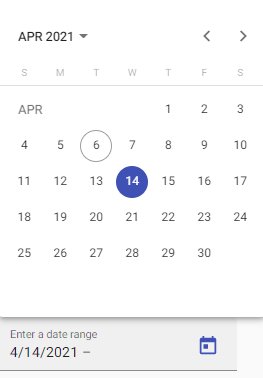
Date Range Input Forms Integration
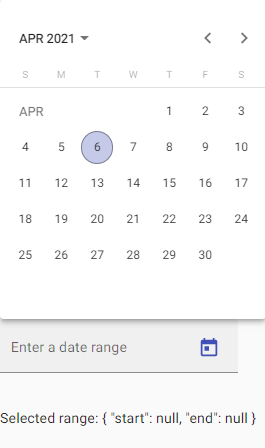
The matte-date-range-input component is used with form graph directive to sum the starting and end values from @angular/forms and validating it as a group.
app.component.html
<mat-form-field appearance="fill">

  <mat-label>Enter a date range</mat-label>

  <mat-date-range-input [formGroup]="range" [rangePicker]="picker">

    <input matStartDate formControlName="start" placeholder="Start date">

    <input matEndDate formControlName="end" placeholder="End date">

  </mat-date-range-input>

  <mat-datepicker-toggle matSuffix [for]="picker"></mat-datepicker-toggle>

  <mat-date-range-picker #picker></mat-date-range-picker>

  <mat-error *ngIf="range.controls.start.hasError('matStartDateInvalid')">Invalid start date</mat-error>

  <mat-error *ngIf="range.controls.end.hasError('matEndDateInvalid')">Invalid end date</mat-error>

</mat-form-field>

<p>Selected range: {{range.value | json}}</p>
app.component.ts
import {Component} from '@angular/core';

import {FormGroup, FormControl} from '@angular/forms';

/** @title Date range picker forms integration */

@Component({

  selector: 'date-range-picker-forms-example',

  templateUrl: 'date-range-picker-forms-example.html',

})

export class DateRangePickerFormsExample {

  range = new FormGroup({

    start: new FormControl(),

    end: new FormControl()

  });

}
Output:
Changing the Datepicker Colors
The datepicker popup inherits the color palette (primary, accent, or warning) associated with the matte-form field. If we want to specify a different palette for the popup, we can set the color property on mat-datapic.
app.component.html
<mat-form-field color="accent" appearance="fill">

  <mat-label>Inherited calendar color</mat-label>

  <input matInput [matDatepicker]="picker1">

  <mat-datepicker-toggle matSuffix [for]="picker1"></mat-datepicker-toggle>

  <mat-datepicker #picker1></mat-datepicker>

</mat-form-field>

<mat-form-field color="accent" appearance="fill">

  <mat-label>Custom calendar color</mat-label>

  <input matInput [matDatepicker]="picker2">

  <mat-datepicker-toggle matSuffix [for]="picker2"></mat-datepicker-toggle>

  <mat-datepicker #picker2 color="primary"></mat-datepicker>

</mat-form-field>
app.component.ts
import {Component} from '@angular/core';

/** @title Datepicker palette colors */

@Component({

  selector: 'datepicker-color-example',

  templateUrl: 'datepicker-color-example.html',

  styleUrls: ['datepicker-color-example.css'],

})

export class DatepickerColorExample {}
app.component.css
mat-form-field {

  margin-right: 12px;

}
Output:

Input and Change Events
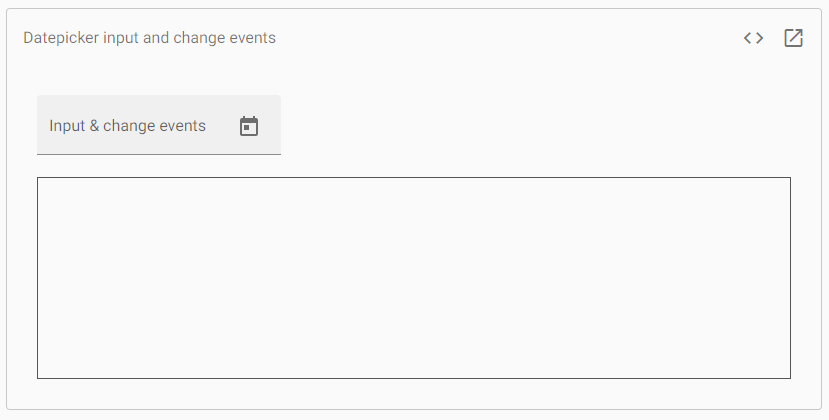
The basic (input) and (change) events of the input will only trigger the user’s interaction with the input element; they are not fire when the user selects a date from the calendar popup.
<mat-form-field appearance="fill">

  <mat-label>Input & change events</mat-label>

  <input matInput [matDatepicker]="picker"

         (dateInput)="addEvent('input', $event)" (dateChange)="addEvent('change', $event)">

  <mat-datepicker-toggle matSuffix [for]="picker"></mat-datepicker-toggle>

  <mat-datepicker #picker></mat-datepicker>

</mat-form-field>


<div class="example-events">

  <div *ngFor="let e of events">{{e}}</div>

</div>
app.component.ts
import {Component} from '@angular/core';

import {MatDatepickerInputEvent} from '@angular/material/datepicker';


/** @title Datepicker input and change events */

@Component({

  selector: 'datepicker-events-example',

  templateUrl: 'datepicker-events-example.html',

  styleUrls: ['datepicker-events-example.css'],

})

export class DatepickerEventsExample {

  events: string[] = [];


  addEvent(type: string, event: MatDatepickerInputEvent<Date>) {

    this.events.push(`${type}: ${event.value}`);

  }

}
app.component.css
.example-events {

  height: 200px;

  border: 1px solid #555;

  overflow: auto;

}
Output:
Choosing a date implementation and date format settings
Datepicker was built to date implementation agnostic. It can be made to work with the implementation of different dates. However, developers need to provide appropriate pieces for Datepicker to work with their chosen performance. The easiest way to ensure it is to import one of the provided data modules:
MatNativeDateModule
| Date type | Date |
|---|---|
| Supported locales | en-US |
| Dependencies | None |
| Import from | @angular/material/core |
MatMomentDateModule
| Date type | Moment |
|---|---|
| Import from | @angular/material-moment-adapter |
Highlighting Specific Dates
If we want to apply one or more CSS classes to some calendar dates (e.g., to highlight a holiday. It accepts a function with each calendar date and will apply to any returned classes. The return value will be anything that is taken by ngClass.
app.component.html
<mat-form-field class="example-full-width" appearance="fill">

  <mat-label>Choose a date</mat-label>

  <input matInput [matDatepicker]="picker">

  <mat-datepicker-toggle matSuffix [for]="picker"></mat-datepicker-toggle>

  <mat-datepicker [dateClass]="dateClass" #picker></mat-datepicker>

</mat-form-field>
app.component.ts
 import {Component, ViewEncapsulation} from '@angular/core';

import {MatCalendarCellClassFunction} from '@angular/material/datepicker';


/** @title Datepicker with custom date classes */

@Component({

  selector: 'datepicker-date-class-example',

  templateUrl: 'datepicker-date-class-example.html',

  styleUrls: ['datepicker-date-class-example.css'],

  encapsulation: ViewEncapsulation.None,

})

export class DatepickerDateClassExample {

  dateClass: MatCalendarCellClassFunction<Date> = (cellDate, view) => {

    // Only highligh dates inside the month view.

    if (view === 'month') {

      const date = cellDate.getDate();


      // Highlight the 1st and 20th day of each month.

      return (date === 1 || date === 20) ? 'example-custom-date-class' : '';

    }


    return '';

  }

} .example-custom-date-class {
background: orange;
border-radius: 100%;
}Output:

Keyboard Interaction
The date picker supports the following keyboard shortcuts:
| Shortcut | Action |
|---|---|
| ALT + DOWN_ARROW | It opens the calendar popup |
| ESCAPE | It closes the calendar popup |
In month view:
| Shortcut | Action |
|---|---|
| LEFT_ARROW | Go to the previous day |
| RIGHT_ARROW | Go to next day |
| UP_ARROW | Go to the same day in the previous week |
| DOWN_ARROW | Go to the same day in the next week |
| HOME | Go to the first day of the month |
| END | Go to the last day of the month |
| PAGE_UP | Go to the same day in the previous month |
| ALT + PAGE_UP | Go to the same day in the previous year |
| PAGE_DOWN | Go to the same day in the next month |
| ALT + PAGE_DOWN | Go to the same day in the next year |
| ENTER | Select current Date |
In year view:
| Shortcut | Action |
|---|---|
| LEFT_ARROW | Go to the previous month |
| RIGHT_ARROW | Go to next month |
| UP_ARROW | Go up a row (back four months) |
| DOWN_ARROW | Go down a row (forward four months) |
| HOME | Go to the first month of the year |
| END | Go to the last month of the year |
| PAGE_UP | Go to the same month in the previous year |
| ALT + PAGE_UP | Go to the same month ten years back |
| PAGE_DOWN | Go to the same month in the next year |
| ALT + PAGE_DOWN | Go to the same month ten years forward |
| ENTER | Select current month |
In multi-year view:
| Shortcut | Action |
|---|---|
| LEFT_ARROW | Go to the previous year |
| RIGHT_ARROW | Go to next year |
| UP_ARROW | Go up a row (back four years) |
| DOWN_ARROW | Go down a row (forward four years) |
| HOME | Go to the first year in the current range |
| END | Go to the last year in the current range |
| PAGE_UP | Go back 24 years |
| ALT + PAGE_UP | Go back 240 years |
| PAGE_DOWN | Go forward 24 years |
| ALT + PAGE_DOWN | Go forward 240 years |
| ENTER | Select current year |
Angular Content is a UI component library developed by the Angular team to build design components for desktop and mobile web applications. To install it, we need to install Angular in our project, and once you have it, you can enter the command below and download it.
Example 1:
app.module.ts:
import { NgModule } from '@angular/core';

import { BrowserModule } from

    '@angular/platform-browser';

import { FormsModule } from '@angular/forms';

import { AppComponent } from './app.component';

import { BrowserAnimationsModule } from

    '@angular/platform-browser/animations';

import { MatButtonModule } from

    '@angular/material/button';

import { MatButtonToggleModule } from

    '@angular/material/button-toggle';

import { MatDatepickerModule } from

    '@angular/material/datepicker';

import { MatInputModule } from

    '@angular/material/input';

import { MatFormFieldModule } from

    '@angular/material/form-field';

import { MatNativeDateModule } from

    '@angular/material/core';

@NgModule({

    imports: [BrowserModule,

        FormsModule,

        BrowserAnimationsModule

  MatButtonModule,

        MatButtonToggleModule,

        MatDatepickerModule,

        MatInputModule,

        MatFormFieldModule,

        MatNativeDateModule

    ],

    declarations: [AppComponent],

    bootstrap: [AppComponent]

})

export class AppModule { }
app.component.html
 <mat-form-field appearance="fill">

    <mat-label>Choose a date</mat-label>

    <input matInput [matDatepicker]="picker1">

    <mat-datepicker-toggle matSuffix [for]="picker1">

    </mat-datepicker-toggle>

    <mat-datepicker #picker></mat-datepicker>

</mat-form-field>

<br>

  <mat-form-field color="accent" appearance="fill">

    <mat-label>Choose a date</mat-label>

    <input matInput [matDatepicker]="picker2">

    <mat-datepicker-toggle matSuffix [for]="picker2">

    </mat-datepicker-toggle>

    <mat-datepicker #picker2></mat-datepicker>

</mat-form-field>

<br>

<mat-form-field appearance="fill">

    <mat-label>Completely disabled</mat-label>

    <input matInput [matDatepicker]="picker3" disabled>

    <mat-datepicker-toggle matSuffix [for]="picker3">

    </mat-datepicker-toggle>

    <mat-datepicker #picker3></mat-datepicker>

</mat-form-field>

<br>

<mat-form-field appearance="fill">

    <mat-label>Popup disabled</mat-label>

    <input matInput [matDatepicker]="picker4">

    <mat-datepicker-toggle matSuffix [for]="picker4"

        disabled>

    </mat-datepicker-toggle>

    <mat-datepicker #picker4></mat-datepicker>

</mat-form-field>
Output:
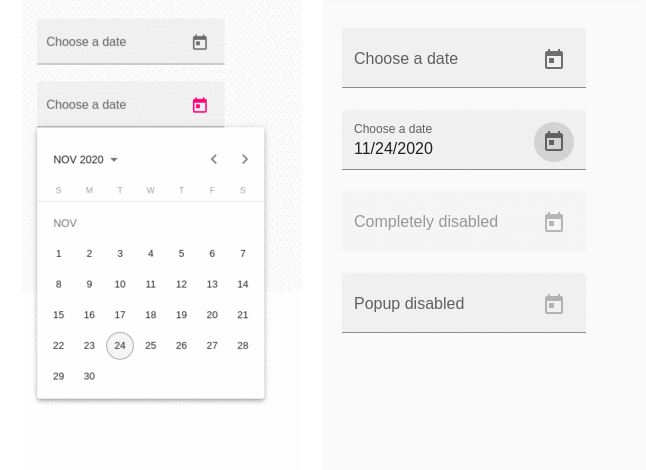
It is the way by which a pop-up containing a calendar will be opened:
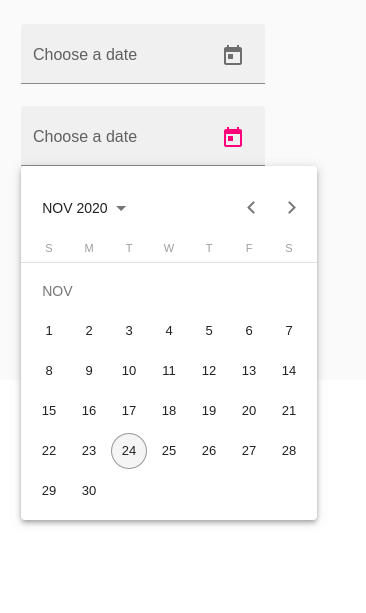
Example 1:
Modified module descriptor app.module.ts.
import { BrowserModule } from '@angular/platform-browser';

import { NgModule } from '@angular/core';

import { AppComponent } from './app.component';

import {BrowserAnimationsModule} from '@angular/platform-browser/animations';

import {MatDatepickerModule, MatInputModule,MatNativeDateModule} from '@angular/material';

import {FormsModule, ReactiveFormsModule} from '@angular/forms';

@NgModule({

   declarations: [

      AppComponent

   ],

   imports: [

      BrowserModule,

      BrowserAnimationsModule,

      MatDatepickerModule, MatInputModule,MatNativeDateModule,

      FormsModule,

      ReactiveFormsModule

   ],

   providers: [],

   bootstrap: [AppComponent]

})

export class AppModule { }
Modified HTML host file app.component.html.
<mat-form-field>

   <input matInput [matDatepicker] = "picker" placeholder = "Choose a date">

   <mat-datepicker-toggle matSuffix [for] = "picker"></mat-datepicker-toggle>

   <mat-datepicker #picker></mat-datepicker>

</mat-form-field>
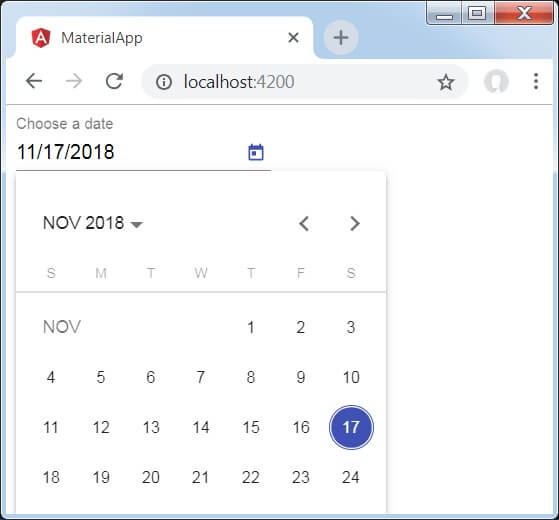
Output:
Explanation
In the previous example, we have created an input box and bind a date picker named picker by using [matDatepicker] attribute. After that, we have created a date picker named picker by using the mat-date picker tag.
Leave a Reply